Showing posts with label #corridors. Show all posts

29 Apr 2019

Resources

This page will be maintained continously to add useful resources for any DeAgostini Millennium Falcon build project.

Note: Due to copryight restrictions, I cannot provide the paragrafix decals anymore. Please refer to the paragrafix website directly.


Cockpit


This is a scan of the original cockpit decal from Deagostini:

https://drive.google.com/file/d/1tXoB-3K_YY1n03eS8tdPghcXxktkEOnF/view?usp=sharing
Original Deagostini Cockpit Decal


This is a custom graphic, which can be used as an optional floor grill for the cockpit:

Custom Cockpit Floor Grill


This is the cockpit decal sheet from Paragrafix, if you need to reprint it:

Link to paragrafix website


This is the cockpit decal sheet from Falcon3DParts, if you need to reprint it:

Click to download PDF


Interior


Different versions for the top of the Dejarik table:


Original Deagostini Dejarik Tabletop


Custom Dejarik Tabletop v1

Custom Dejarik Tabletop v2


This is a template for the instrument panel of the bench (couch) in the cargo hold area:

Cargo Hold Bench Panel


These are two original set blueprints for the bench (couch) area in the cargo hold:

Bench Blueprint 1


Bench Blueprint 2


This is the cargo hold decal sheet from Paragrafix, if you need to reprint it:

Link to paragrafix website


This is the corridor decal sheet from Paragrafix, if you need to reprint it: 

Link to paragrafix website


This is the gun port decal sheet from Paragrafix, if you need to reprint it:  

Link to paragrafix website


Hull


This is a decal sheet for the small markings on the hull, if you don't like to apply them manually:

Custom Hull Markings


Frame & Hull Plates Blueprint


Click to download PDF


Screw Specifications


Click to enlarge


Model Specifications


  • Scale: approx. 1/43
  • Length: 808 mm
  • Depth: 596 mm
  • Height: 192 mm
  • Weight: 12 kg / 26.5 lb
  • Power Supplies: 6 AA batteries internal (6V) or 1000mA external (9V) w/ 5.5 x 2.5 mm male connection
  • Main Board Connectors: JST XH 2.5 2/3 Pins


5 Apr 2019

Part 10 - Corridor Modifications

The grade of details on the interior parts is one of the weaknesses of this model and one of the reasons, why so many aftermarket parts exist for the inner parts.
I have spend the last days doing the following modifications to the corridors:
  1. Wall lamp detailing using Paragrafx parts and 3D printed parts
  2. Green wall lighting
  3. Additional Paragrafx corridor details
  4. Under-floor lighting
  5. Long corridor illusion

Painting

All the corridor hull parts are painted with Tamiya Flat Dark Grey (XF-24).

For the wall pads I used Tamiya XF-55 (Deck Tan) over a prime coat of XF-49 (Khaki) and then did some weathering with Oil Stain from Tamiya Weathering Set D.


The Paragrafix corridor floors where painted with a XF-24 (dark grey) base coat and then dry brushed (toothbrush) with XF-1 (flat black) and some X-11 (chrome silver). No priming was done in order to let the brass color of the Paragrafix part come thru on some edges.


Wall Lamps & Lighting

For the wall lamps I used a combination of the following aftermarket parts:


Under-Floor Lighting

The floor parts of the Paragrafix corridor set have been put on top of the stock parts, after removing the edges in order to let the light shine through the grill. LED stripes where glued on the hull part after light blocking with some self-adhesive aluminium tape.


Wall Pad Weathering

I like more subtle weathering and had taken special care of not to overdo this on the wall pads. Only slight weathering has been added to give the wall pads a used look by adding some Oil Stain from the Tamiya Weathering Set D.


Long Corridor Illusion

To give the illusion that the corridor continues beyond the edge of the stock part, I added an additional spare ring together with a second pad ring and glued a mirror to the ring.


The red line indicates the position of the mirror.


31 Jan 2019

Part 4 - Interior Modifications and Upgrades

As I am planning to do some extensive upgrade work on the interior lighting, I will need a solid base for that and replacement parts, if something goes wrong.

Therefore the following modification and upgrade parts from Paragrafx will be used:

Cockpit
A complete cockpit interior replacement, together with some very detailed decals.
Paragrafx Falcon Cockpit
Corridors
As I am planning to light the corridors, these parts are needed to upgrade the floors.
Paragrafx Falcon Corridors
Gun Port
Same as for the cockpit, this is a complete interior replacement, together with some very detailed decals.
Paragrafx Falcon Gun Port

Cargo Hold
Probably one of the most important parts of the model to upgrade and modify, this photoetch is a must for replacing the floor grill of the cargo hold and especially when planning to add the maintenance pit mod (deeper hold mod).
Paragrafx Falcon (Cargo) Hold
Engine Vents
Like for the exhaust grill, the engine vents are also available as a nice replacement part in the form of photoetch parts. The grill of the vents can be bent a little to give it a nice, used and damaged look, which is my primary goal for this mod.
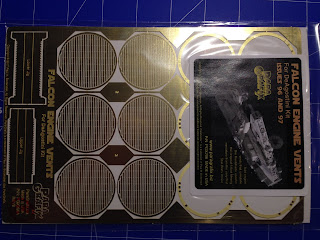
Paragrafx Falcon Engine Vents
Figures
The original model does not come with any figures representing our most beloved human and droid characters in the universe. I find this being a must upgrade for the model, both in the maintance hold area and in the cockpit. So I ordered 3D printed figures from Falcon3D at Shapeways.
3D Printed Figures
These include: R2D2, C3PO, Han, Luke, Ben and Leia. There is also a nice replacement for the Navigator seat, which is more detailed than the original.

That's it so far for planned modifications and upgrades and the next post will be about opening the first packs and starting to build.