8 Feb 2019

List Of Issues 1-100 And Their Content

I made a list of all issues and their content, which you can download here.

I find it useful to have a list of the content of all issues if you are (like me) planning to build the Falcon in a non-linear way.

The list was made based on a document from model-space containing all back issues. You can download this document here.

Downloads

 
List of issues 1-100 download


Back issues download


4 Feb 2019

Part 8 - Cockpit Replacement Kit by Falcon3D

I am planning to do some kind of "Frankenstein" cockpit, combining original cockpit parts with replacement parts from Falcon3D and Paragrafx.

Falcon3D Cockpit Replacement Kit

The following pictures give a side by side comparison of the Falcon3D replacements with the original parts.


The kit comes with a new cockpit cone, cockpit floor and console, door frame, pilot and co-pilot seats, photoetch parts for the back wall, door and grill ring and some very nice figures and decals.

The cockpit console is very different to the original part, the pilot seats are smaller, the co-pilot seats are higher and the door frame is wider.

Falcon3D parts (left) and original parts (right)

Falcon3D door frame (left) and original door (right)

The replacement kit contains figures of Chewie, Han, Luke, Ben, C3PO and two versions of Leia.

Original cockpit floor and console (left) and Falcon3D replacement (right)

The Falcon3D kit comes with a back wall which is transparent for diffusion of the backlight.

Stay tuned for pack 5 and 6 and the Paragrafx cockpit replacement which is next on my to-do list.

Part 7 - Dejarik Table Decal Replacement

As you can see on the following reference stills from the movie, the Dejarik table (holographic chess-type game) has a metallic surface look.
The decal coming with the DeAgostini model has a black on white checkerboard instead.
I decided to not use the decal, but to print my own.
The Dejarik table has a metallic surface.
Source: StarWars.com
The original decal has a black on white checkerboard, which does not match the movie reference.

Dejarik Checkerboard Decal

I used the following decal template and printed it on waterslide paper in the correct size.

New Dejarik table checkerboard decal.
Original decal (left) and new decal (right)


Cutting out the new decal.

Original (above) and new decal (below) for comparison.

The new decal has the same metallic surface look as the movie reference.

Part 6 - Upper Turret Cannon Window Orientation

As you see on the following reference photo of the studio model, the orientation of the frame of the upper turret cannon window is wrong on the DeAgostini part.
Reference photo of the studio model © Starship Modeller

To correct the orientation, the window frame has to be removed and re-glued into the correct position.
As shown in the photo, there is a part where you can slide though a tiny whole with a sharp knife in order to remove the window frame. Before that you have to cut on the under side and carefully examine the areas, where glue has been applied by the factory.
The window frame can be completely removed, as it is simply glued onto the hull part.

This part has to be chipped away in order to be able to re-attach the frame part to hull part.
There is a small recess, where the frame was originally fitted in.
After dettaching the frame, I scratched away all remaining glue and sanded down all remaining glue, so that it can be re-glued.

BEFORE modiification
AFTER modification

Part 5 - Pack 1 to 4

Today was the day, where the first packs of the original DeAgostini model were opened and examined.
Pack 1 contains the cockpit back wall, cockpit floor and front console, hull parts and the upper turret cannon.

Pack 2 includes a screwdriver tool, the upper turret cannon window, the dejarik table and cockpit and hull parts.

Pack 3 contains the pilot and co-pilot seats, cockpit door and hull parts.

Pack 4 has hull parts and the front plate for the cockpit console.

Already upon examination of these packs I decided that some modifications will be necessary:
  • The whole cockpit will probably be replaced by the cockpit replacement kit from Falcon 3D Parts.
  • The decal of the Dejarik table (hologame chess table) has the wrong coloring.
  • The upper turret cannon window frames have the wrong orientation.

Assembling the Cockpit

Nevertheless I assembled the cockpit to get a reference.
Cockpit back wall and floor part with console.

When applying the decal to the cockpit door, I inserted the decal first and then used a brush to press it down carefully. There is only one chance to do this correctly.

Decal applied to the cockpit back wall, Door inserted and floor piece applied.

The pilot seats have the wrong coloring and size.

The cockpit back wall console looks quite good, when backlight is applied.

The front panel of the cockpit console is attached.

First Hull Parts Assembling

The provided screwdriver is actually quite good, when applying tiny screws to the hull skeleton.

This will be the beginning of a long process of attaching hull skeleton parts to each other.


The hull parts are mounted onto the hull skeleton.


This hull part gives a hint of the actual size of the whole model.
In part 6 I will start to do modifications to standard parts delivered as they do not meet my expections.

31 Jan 2019

Part 4 - Interior Modifications and Upgrades

As I am planning to do some extensive upgrade work on the interior lighting, I will need a solid base for that and replacement parts, if something goes wrong.

Therefore the following modification and upgrade parts from Paragrafx will be used:

Cockpit
A complete cockpit interior replacement, together with some very detailed decals.
Paragrafx Falcon Cockpit
Corridors
As I am planning to light the corridors, these parts are needed to upgrade the floors.
Paragrafx Falcon Corridors
Gun Port
Same as for the cockpit, this is a complete interior replacement, together with some very detailed decals.
Paragrafx Falcon Gun Port

Cargo Hold
Probably one of the most important parts of the model to upgrade and modify, this photoetch is a must for replacing the floor grill of the cargo hold and especially when planning to add the maintenance pit mod (deeper hold mod).
Paragrafx Falcon (Cargo) Hold
Engine Vents
Like for the exhaust grill, the engine vents are also available as a nice replacement part in the form of photoetch parts. The grill of the vents can be bent a little to give it a nice, used and damaged look, which is my primary goal for this mod.
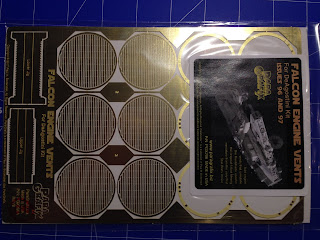
Paragrafx Falcon Engine Vents
Figures
The original model does not come with any figures representing our most beloved human and droid characters in the universe. I find this being a must upgrade for the model, both in the maintance hold area and in the cockpit. So I ordered 3D printed figures from Falcon3D at Shapeways.
3D Printed Figures
These include: R2D2, C3PO, Han, Luke, Ben and Leia. There is also a nice replacement for the Navigator seat, which is more detailed than the original.

That's it so far for planned modifications and upgrades and the next post will be about opening the first packs and starting to build.

Part 3 - Ramp Modification

When I first discovered that there is a complete replacement kit for the ramp, my interest
arouse instantly!
dragnse7en has an entry on Shapeways for a Complete Ramp Mod Kit.
This kit replaces the ramp, except for the motor and some mechanical parts, puts some additional detail to the interior corridor connection and looks very sophisticated. However a lot of modifications are necessary to the original model, which are irreversible and may hinder some from implementing this.


Falcon Complete Ramp Mod Kit
The kit is out of stock most of the time, but I contacted dragnse7en directly and he build one on-request.

This is what he writes about his mod kit:
"This is a set of parts for the Loading Ramp and the Airlock Entry that goes into a curved corridor.
The Hull Frame will need to be cut, sanded, and finished to make this mod fit properly inside the model, so this part set is not a plug-and-play or direct bolt-on kit, and is not recommended for novice or average model builders."
Falcon Complete Ramp Mod Kit © dragnse7en

I planning to give it a try and will report in detail!